Friday, July 30, 2010

Cinderella Top Tutorial


Here it is!! Finally right? The tutorial for this top . Sorry it's taken so long but it's been a crazy busy summer. 


Let's get started!! This is a very basic and simple pattern.


You will also need to cut two (2) 45" x 2" strips and (2) 45" x 3" wide strips.
 These strips will become the pleats and bias tape.


Grab your front piece and fold in half. We are going to create the "V neck." Start by cutting a  2" wide and deep V.  then make a 1/4" slit like above photo. This will create 2 flaps. Fold back and press down.


Time to crate pleats.  Grab one of your 2" strips and fold and press in half (right side facing out). If you have a pleat maker/ruffler begin to create your pleats. If you are like me I made mine by hand by folding every half inch like below.


Pin pleats to bodice and then bast using a strait stitch.


Next grab you bias tape. You can make your own or use store bought tape.  Here is a great video for making bias tape.

Sandwich and pin the edge of the front halter arms and chest. Stitch along the open edge of the bias tape, being sure to catch the underneath layer in your seam. Do this the whole length of the tape from one end to the other.


Fold the top in half  find the center of the neck strap. Cut in half. At this point you will want to use your child to measure how long your neck straps need to be and mark where the button and buttonhole need to go.

Notice in below photo one side is longer than the other. This is because the buttonhole needs to over lap the button.
Here is a tutorial for a buttonhole if you need one.


Tuck in and finish the edges. Set the front aside.


Now grab your back halter fabric (the plain rectangle) and fold down one of the long edges 1/4″ and press. Fold again approximately 1″ and press. Then sew along your fold to create your elastic casing.


Next, cut a piece of elastic that will fit your child. You can measure across her back from armpit to armpit to get an idea. Ours was approximately 9". Sophia is on the small side for 3 1/2 :)

Anchor one end of your elastic with a straight pin at one end of your casing. Attach a safety pin to the other end of your elastic and use the safety pin to feed the elastic through the casing.

Half way done!
Now pin the front and back pieces together (right sides facing together) and do a running stitch down each side leaving a 1/2" seam.


Then do a zig-zag stitch down each side to finish edges.


On to the hem.
With your garment inside out  fold up 1/4" and press and  then a 1/2" fold and press. Pin pleating to hem and  using a strait stitch bast pleats to the hem line.


YOUR DONE!

Sew Basic: Buttonhole


Sewing a buttonhole now days is a snap! Almost every machine has this feature built in and it's as easy as 1, 2, 3. I always suggest doing a practice run on a scrap piece of fabric. This will ensure that your threading and tension are all correct.

I sew on a Kenmore, it features a buttonhole sensor and came with this special  foot. It does all the math and work for you!!


Select which Buttonhole Mode/style you need.


Place the button in the foot till it is held firmly in place. Then attach the foot to your machine.


Pull the buttonhole lever down as far as it will go. This is the black tab on the left center of the photo. This lever will ensure the proper sizing of you buttonhole.


Center your fabric and press "start" or begin sewing.


Almost done. Grab your seam ripper and slowly push up the center to the buttonhole creating the opening for the button to slide through.


Perfect!


Sunday, July 25, 2010

New Favorite Thing

 Have you heard of Meri Meri? They are a company that makes beautiful stationary and partyware.  I discovered Meri Meri at the "Sophia's" birthday party. My friend Sarah made the yummiest cupcakes  that were topped with these beautiful little fairies. It was love at first sight for me!


I have to admit I was totally jealous that Sarah discovered these and I did not! My Sophia would LOVE these little toppers for her Birthday cupcakes. Good thing there are lots of other fun cupcake toppers to choose from!!!

Here are just a few to inspire you. Go check them out http://www.merimeri.com/

Tuesday, July 20, 2010

Lamp Shade Painting

Seriously...did you know you could do this!?!  Paint a lamp shade? Who knew!

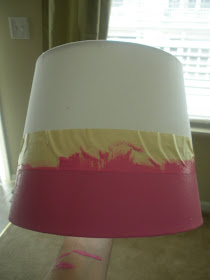
As you may know I've been in the process of decorating Sophia's new bedroom. I have a lamp shade from her old room that is green and white and just does not match the new color scheme. So while looking at it  (light bulb) I thought paint it! It was worth the try. Besides I bought it from Goodwill 2-3 years ago for I think $2.

Here is the shade before:


The process was super simple! I started by picking at the end of the ric-rack and it just peeled right off. 


Then I used masking tape to mask off the area which was going to be painted.


I used Americana Razzle Berry Acrylic Paint and a sponge brush and went to town painting it.


Ta-Da!!!


Thursday, July 15, 2010

Sponge Ball Water Fights


These are a fun alternative to water balloons and they are super easy to make. I found this great idea while watching "Martha On Demand." All you need to make one is 3 sponges. I picked three different colors to make them more fun and appealing to kids.


Cut each sponge into 3 strips.


Stack sponges alternating each color.


Take twine or floss and wrap around center pulling tight.  Tie a strong knot.


 Trim strings and have fun!


Join us Saturdays at tatertotsandjello.com for the weekend wrap up party!

Wednesday, July 14, 2010

Birthday Dresses for the Sophia's


We have a Birthday party this Friday for my Sophia's friends Sophia and Sophia. Yes, you read that correct they all three are named Sophia.

I knew right away I wanted to make the girls dresses as the gift. What little girl does not love a new dress? Besides a while back I had bought a few new patterns and bookmarked some tutorials on the web, so this would be the perfect opportunity to try them out.

I scored at Joann's on the fabric. I spotted the lavender floral in the clearance section which also happened to be an extra 50% off!!!!!  It is "Ribbon Dance" Stonehill Collection by Donna Wilder. The green is called "Topsy Turvy" from the same collection.
 

The first dress I used New Look 6960 Size 3. Pretty easy pattern for the most part except the collar. I feel the directions were not very clear and I had to wing it during this step. The pattern called for a zipper which I was excited as it was my first one! I must say I love the way it turned out and my Sophia keeps asking for one of her own.


The second dress is a Pillowcase dress. I was inspired by this dress that Anneliese created for her daughters. It is one of the most simple dresses to make and I learned how to sew a french seam. I absolutely love the big bow!

I hope you girls love your dresses!

make it wear it

giveaways
Join us Saturdays at tatertotsandjello.com for the weekend wrap up party!